Are you thinking about transforming the look of your home with a new floor covering? Choose vinyl flooring!
Not only does it provide an easy and efficient way to give any space in your home a stylish update, but it also offers the opportunity to conceal discolored, cracks, or outdated tiles.
Whether you’re a homeowner looking for DIY solutions or an interior designer working with clients on their dream design, this beginner's guide, covering existing tiles with vinyl, is here to help make that task easy. Learn how to choose the right type of vinyl flooring all the way through instructions on installation so you can seamlessly cover up those old floor tiles today.
Understanding the Benefits of Vinyl Flooring as a Cover-up Option for Floor Tiles
Many homeowners love the look of floor tiles but, over time, they can become outdated or dull. One quick and easy solution for renewing their floor look is to use vinyl flooring as a cover-up option.
There are several benefits to choosing this type of flooring for covering existing tiles on the floor:
- Cost-effective: Vinyl flooring is generally more affordable than many other flooring options, making it a cost-effective solution for those looking to update their floors without breaking the bank.
- Easy to install: Vinyl flooring is relatively easy to install, especially compared to more complex flooring options like hardwood or tile. The installation process typically involves measuring and cutting the vinyl to fit the room, applying adhesive, and laying the vinyl on the floor.
- Easy to maintain: Vinyl flooring is generally low-maintenance and easy to clean. Regular sweeping and mopping are typically all that is needed to keep the flooring looking its best.
- Durable: Vinyl flooring is known for its durability and resistance to wear and tear. It is also often resistant to moisture and stains, making it a good option for high-traffic areas or homes with children or pets.
- Wide variety of options: Vinyl flooring is available in a wide variety of colors, patterns, and designs, so homeowners can choose a style that suits their personal taste and complements their existing decor. There are also options that mimic the look of hardwood or stone, for those who want a more traditional flooring look.
Below are some popular vinyl flooring options for different areas of the home:
Living Room
- 1. Westall Oak in a beige and light brown mix creates a natural and simple, bright and low-key style.
- 2. Tonino Ash in dark brown allows homeowners to create a noble and luxurious space.
- 3. Mitchell Oak, one of the LVT floors used in Scandinavian design, has a smooth and fine whitewashed wood grain texture. This floor complements the furniture and home furnishings to create a low-key, quiet, and natural atmosphere.
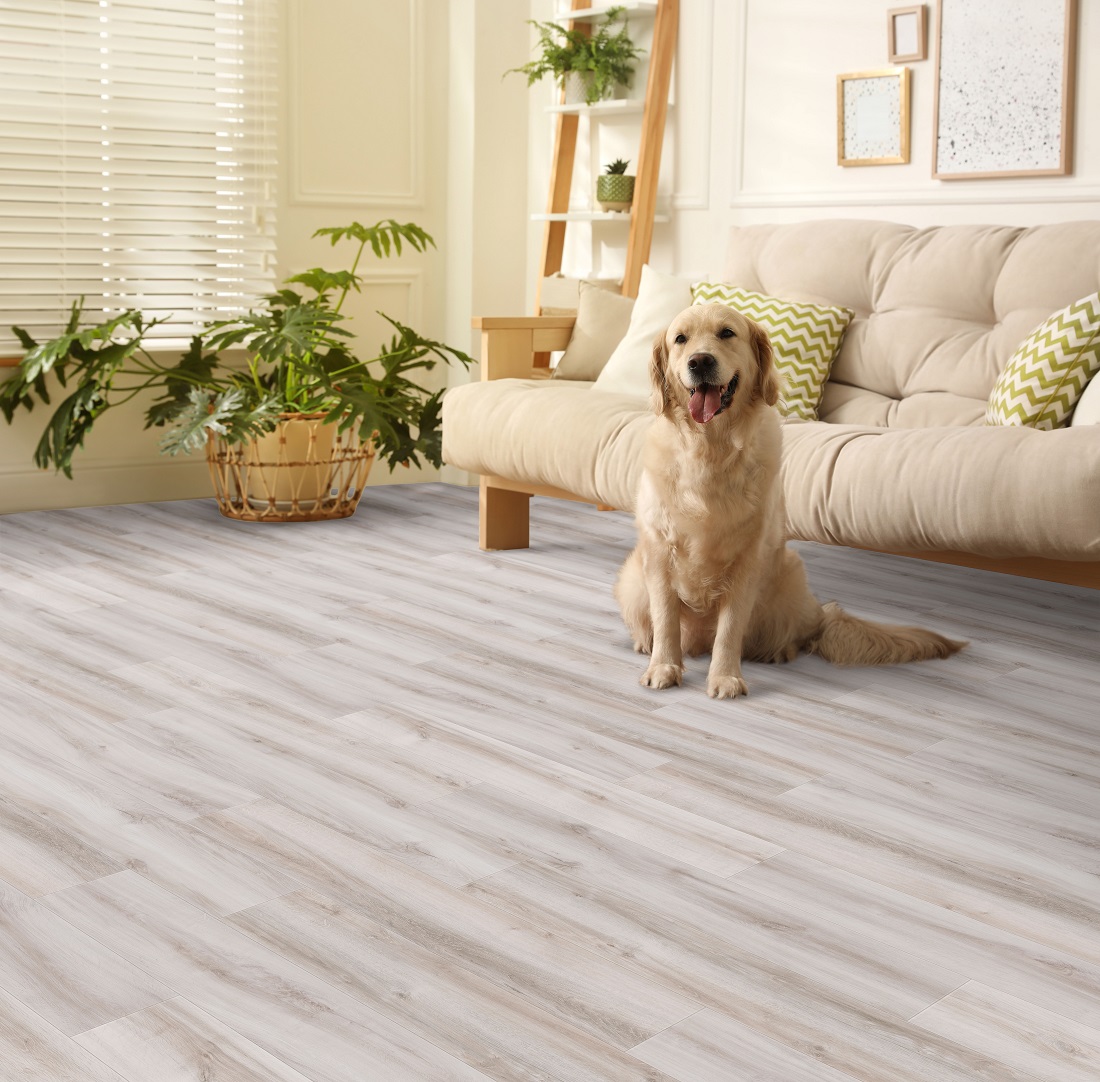
Westall Oak
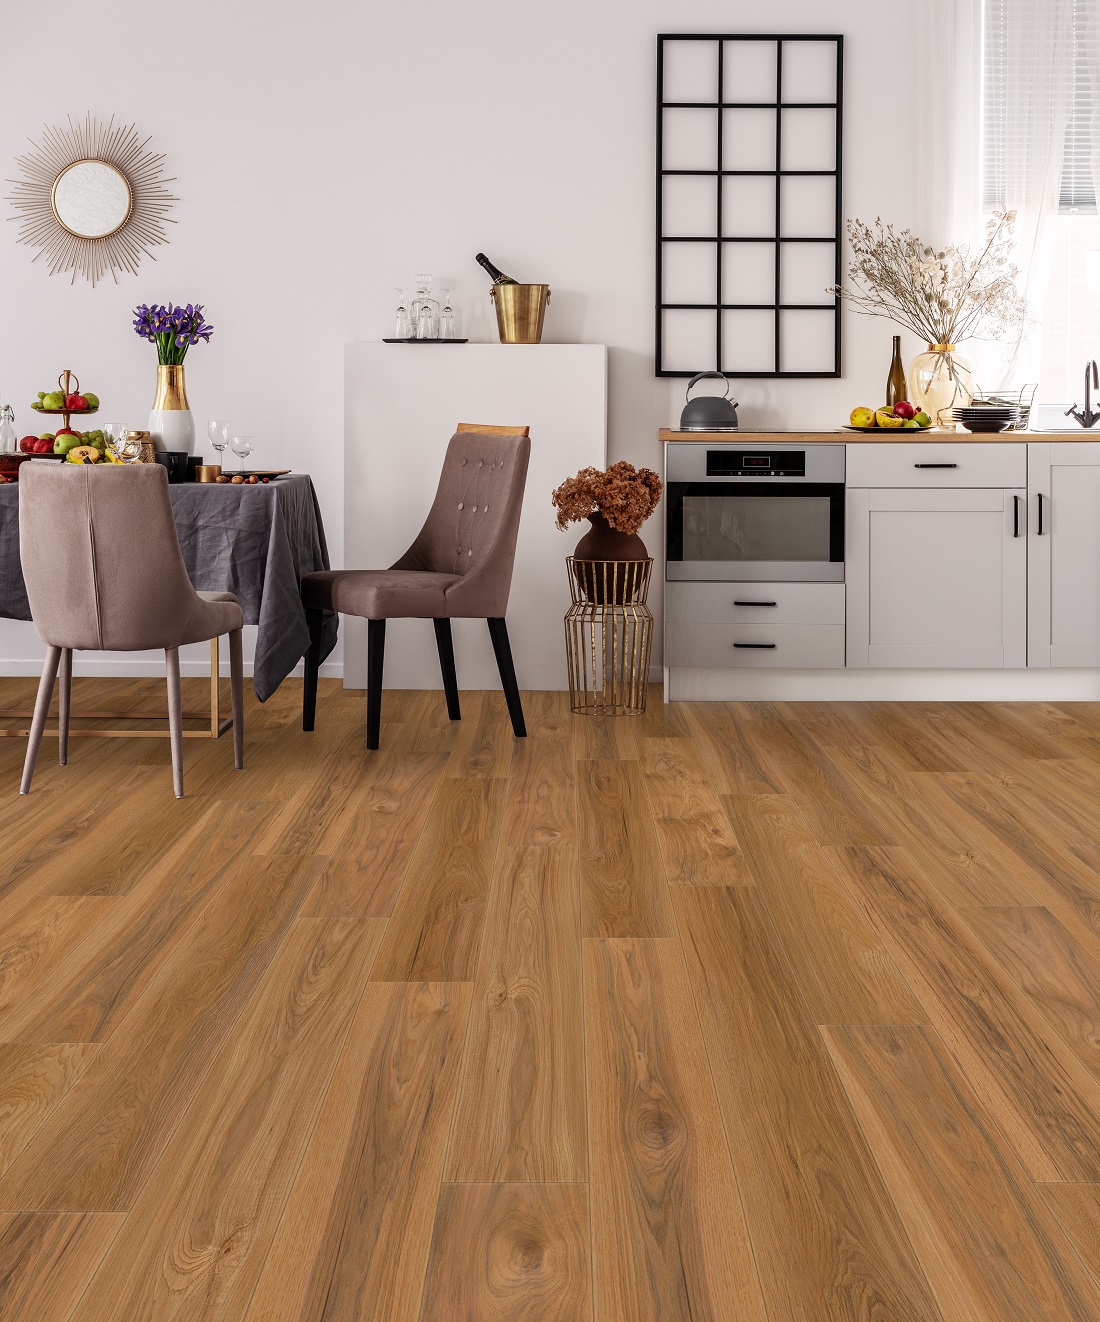
Kitchen

Fernie Pine
1. Peak Hickory in bright brown has strong contrast patterns that harmonize with the overall warm and consistent visual appeal of the kitchen.
2. Bolgart Oak in beige features natural wood growth cracks that gently show off the owner's design and taste for kitchen wood grain floors.
3. Fernie Pine is a newly launched option with warm wooden rings and natural nodes that bring the vitality of the forest into the kitchen wood grain floor.
The Different Types of Vinyl Flooring Available
When it comes to choosing the right type of vinyl flooring to cover existing tiles, there are several options to consider. The three main types of vinyl flooring are sheet, tile, and plank.
Sheet vinyl comes in large rolls and is typically the most cost-effective option. Vinyl tile is made to look like traditional tile and is available in a range of sizes and designs. Vinyl plank is designed to look like hardwood flooring and is available in different sizes and finishes.
Tips for Choosing the Right Kind of Vinyl Flooring for Your Home
When choosing vinyl for covering floor tiles, you should consider a few factors.
Firstly, look at the size of the room that needs to be covered: it's important to make sure your vinyl will cover the room adequately and match any adjoining rooms too if they have vinyl in them already.
Secondly, the thickness of vinyl flooring should also be considered. Thicker ones tend to be more durable and resistant to wear and tear while a lower thickness can be easier to install.
Finally, think of the overall look you want to achieve; whether you prefer a patterned style or something more plain, there are plenty of options out there to suit all tastes. When done right, new vinyl can update the aesthetic of your home in no time at all!
Preparing the Surface Before Installing Vinyl Flooring
Preparation of the existing floor is essential before covering tiles with vinyl flooring. First, remove any furniture and items from the room and vacuum or mop away any debris from the surface. Then check that all underlying floors are even and in good condition. This can be done by using a spirit level and filling any dips or cracks with an adhesive filler product. Any loose tiles should also be removed and replaced if necessary.
Once fully prepped, you can then select the right type of vinyl flooring for your needs, depending on the style or look you are going for as well as any specific features needed due to foot traffic in your home. With everything ready to go, it’s time to start laying down the new vinyl flooring to revitalize your space!
Peak Hickory
Step-by-Step Instructions on How to Install Vinyl Flooring Over Existing Tiles
Once you have selected the right type of vinyl flooring for your project, it's time to start the installation process. Here are the basic steps involved in installing vinyl over existing tiles:
- 1. Measure and cut the vinyl to fit the room: Start by measuring the dimensions of the room and cutting the vinyl to the correct size. It's important to leave a small amount of excess vinyl around the edges to allow for trimming later.
- 2. Apply adhesive and lay the vinyl on the floor: Apply the adhesive to the subfloor and carefully lay the vinyl on top, smoothing out any bubbles or wrinkles as you go.
- 3. Trim excess vinyl and finish the edges: Once the vinyl is in place, trim any excess material around the edges of the room. Finally, finish the edges with baseboards or trim for a professional-looking result.
While these steps provide a general overview of the installation process, it's important to follow the manufacturer's instructions for the specific type of vinyl flooring you have chosen. Proper installation will ensure that your new vinyl flooring looks great and lasts for years to come.
Discover more: How Do I Choose An LVT Floor? Popular LVT Flooring Colours
Discover more: SPC Flooring Pros and Cons, Analysis of Various Materials